

Getting Started
Welcome to Chronicle! Chronicle is designed so that you can get started using it right away with almost no learning curve. This quick start guide will help you make the most of Chronicle in just a few minutes. You may also want to watch our Quick Start Video. It is only a few minutes long, and will introduce you to the basics of using Chronicle.
How to Use This Guide: A table of contents is available to the right if you want to quickly jump to a specific topic. Otherwise, just read through from top to bottom for a complete overview.
What Is Chronicle? Chronicle is a bill tracking and reminder app. It is designed to remind you when your bills are due, and keep track of your payments, receipts and balances with minimal input from you.
Creating and Editing Bills
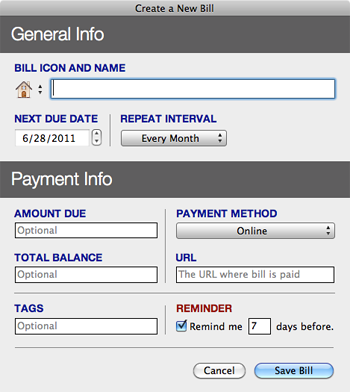 Creating New Bills: To create a new bill, click the New Bill toolbar icon, or select File>New Bill from the menu. The new bill window is pictured to the right, and the various fields are described below:
Bill Icon and Name: Each bill should have a unique name to identify it. You can choose an icon to identify each bill by selecting an icon from the drop-down list to the right of the bill name.
Next Due Date: Select your bill's next due date here.
Repeat Interval: Choose the option that corresponds with how often you pay the bill. For example, if your bill is due each month, select "Every Month". If you do not see an option on the list that fits your bill, select the "Custom" option.
Amount Due: (Optional) If your bill has a set amount due each cycle (for example: a mortgage payment, car payment or insurance payment), you can enter the amount here.
Total Balance: (Optional) If your bill has a balance (for example: a car payment or credit card payment), you can enter that balance here. See interest rates for information on how to add the interest rate to your bill so that the balance can be accurately updated when you log payments.
Payment Method: You can set the payment method to Online, Automatic, or Other. Use Automatic if your bank or biller automatically pays your bill (Chronicle does not make payments for you). Use other if you pay your bill over the phone or through the mail. If you select Automatic and have entered an amount due, Chronicle can optionally record payments each cycle for you.
URL: (Optional) Enter the URL where you pay your bill if you pay online. Chronicle will load this URL when you press the Pay Now button from the Bill Detail Screen. See Logging Payments for more information.
Tags: (Optional) Tags allow you to categorize and filter your bills. See Tagging for more information.
Reminder: Leave this box checked, and Chronicle will remind you before your bill is due, using iCal. You can also change how many days before the due date you will be reminded. Uncheck this option if you don't want to be reminded.
Editing Bills: To edit a new bill, select it on the Overview list, and click the Edit Bill toolbar icon, or select File>Edit Bill from the menu. You can also double click a bill on the Overview list to view the detail screen for that bill. Then you can click the Edit Bill toolbar icon to edit it. The Edit Bill window is virtually identical to the New Bill window (see preceding section for details).
Logging Payments
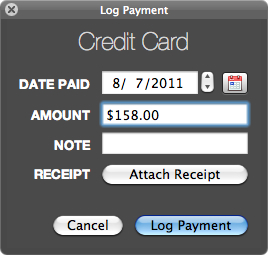 Making and Logging Full Payments: When it is time to pay a bill, you can select it on the Overview screen. When the bill is selected, three buttons appear across the bottom of the Overview list: View, Pay, and Log Payment. Click the Pay button, and a new window will open in your default browser, showing the bank or URL where you pay your bill (note: you must enter a URL when creating or editing a bill for this button to work). Click the Log Payment button to open a small, semitransparent window (see screenshot) that allows you to enter details about your payment. You can also access the Pay and Log Payment buttons by clicking View to view the bill's details, and then clicking the appropriate buttons located on the yellow sticky note.
The Log Payment Window: The Log Payment Window contains the following fields described below:
Date Paid: The date you paid the bill (defaults to the current date).
Amount: The amount you paid (defaults to amount due if one is entered).
Note: An optional field. You can type or paste a confirmation number here.
Receipt: Click the Attach Receipt button to attach a saved or scanned receipt. A dialog will open, prompting you to select the location of the receipt file. Upon selecting it and clicking the Attach button, the receipt will be copied to Chronicle's database.
What Happens When You Log a Payment: When you log a payment, the following things happen: Chronicle adjusts the next due date of your bill, and updates the reminder in iCal to reflect the new due date (if reminders are on). If applicable, your total balance is also adjusted, and the average paid is recalculated. An entry is created on your Payment History which can be seen when viewing the details of a bill.
Logging Partial Payments: Sometimes you may wish to log a partial or historical payment that does not update the due date. You can do this by holding down the Option key while viewing the Overview or Bill Detail Screen. While holding down the Option key, the Log Payment button changes to say Log Partial, and the green icon on the button turns orange. While holding down the option key, click the Log Partial button. A modified Log Payment window appears that allows you to log a payment without changing the due date. In this way, you can also enter historical payments for your record keeping purposes.
 Editing Payments: If you make a mistake logging a payment, you can edit it by viewing the bill details and then double-clicking an entry on the payment history. The payment history is located at the bottom-right of the window, to the right of the bar graph (see screenshot).
Viewing Receipts: When you have attached a receipt to a payment, a small paperclip icon will appear next to the payment on the payment history. To view the receipt, click on the entry on your payment history. A small View Receipt button will appear to the right of the words "All Payments" at the top of the payment history. Click the button to view your payment.
Manual Under Construction
Please accept our apologies! The rest of the user manual is still under construction. We will be updating it daily. In the meantime, if you need help, contact us at support@littlefin.com and we will get back to you as soon as possible.
System Requirements
Chronicle requires Mac OS X Snow Leopard or greater, and is Snow Leopard compatible. Leopard Users: Chronicle 3 is available and still supported for those using Leopard. Tiger Users: Chronicle 2 is available for those using Tiger. Download Chronicle 2 click here. View the Chronicle Update Feed to see a history of changes.
